The effect that pruning has on a plant is huge. We have the power to transform our plants for better or worse every time we make a cut, so it pays to be careful of why and how we make every single one.
This article explains in detail how to prune ornamental plants for their health and shape. It doesn’t describe how to prune fruit trees for maximal fruit or the best frame which will be coming in a later article.
It’s important to keep in mind that every plant has its own personality and needs, and pruning preferences are no different. You can take a brush cutter to a grass field, a seaside daisy shrub or a mint garden and you could bet that those plants will come back stronger than ever.
But not all plants are as tolerant to pruning as this. Some need to be pruned during a certain time of the year, and others are just plain sensitive to pruning altogether and are likely to be badly damaged by the uninitiated gardener.
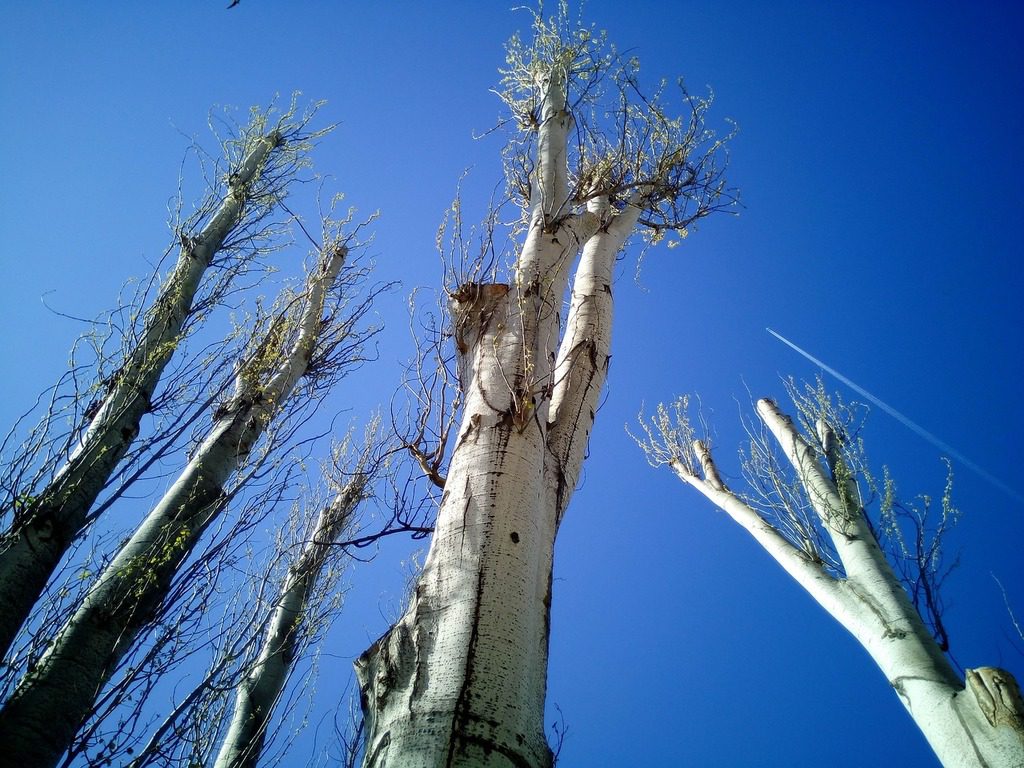
Technically, the best time to prune is during the dormant season, and for most plants this is winter. Deciduous trees have lost their leaves, but with a keen eye you can still differentiate between dead wood and living tissue.
Flowering plants and fruit trees sometimes form their buds before winter, so you may want to prune after spring to allow all of the flowers to bloom on certain species.
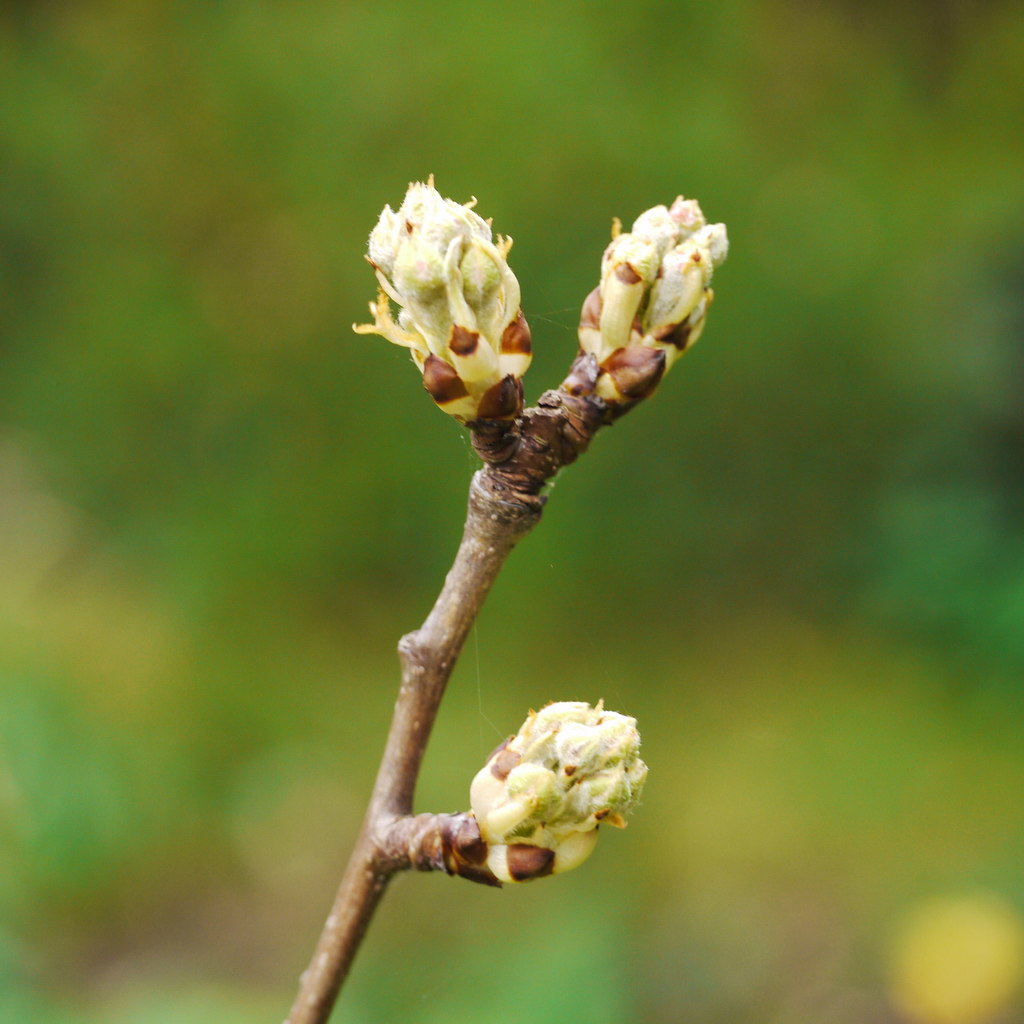
If you prune your fruit trees in winter, buds you’ve pruned off won’t grow flowers like these gorgeous spring pear buds that are about to erupt. Image source
With that being said, realistically pruning can usually be done at any time of the year as long as it isn’t too hot, because plants pruned on hot days have no defence against losing their moisture out of the fresh cuts which can be very distressing for them.
Contrary to popular opinion, pruning does not discourage new growth. In fact, it encourages it. When done correctly, pruning is actually very beneficial for a plant, and those plants that are pruned well are much better off than plants that are never pruned at all.
Plant Amnesty’s 4 Don’ts of Pruning
Plant Amnesty is an American not-for-profit organisation dedicated to ending “the senseless torture and mutilation of trees and shrubs caused by mal-pruning”.
They have a wealth of knowledge in the form of online articles and YouTube videos to help gardeners of any skill level improve their green thumb energy by learning about the effects of different cutting methods on plants, and have been a huge influence on Plants Grow Here.
Here are their “4 Don’ts” of pruning:
1. Don’t top
Topping cuts (indiscriminate cuts on a branch or stem without leaving a lateral branch that is large enough to take on the terminal role, also called a non-selective cut) are especially hard on a plant.
First of all, a tree that has been topped will endeavor to grow to be the same size that it was as soon as possible.
What will happen is that your plant will throw out a whole heap of water sprouts to take up the space that it has just lost, in an unstructured and chaotic manner.
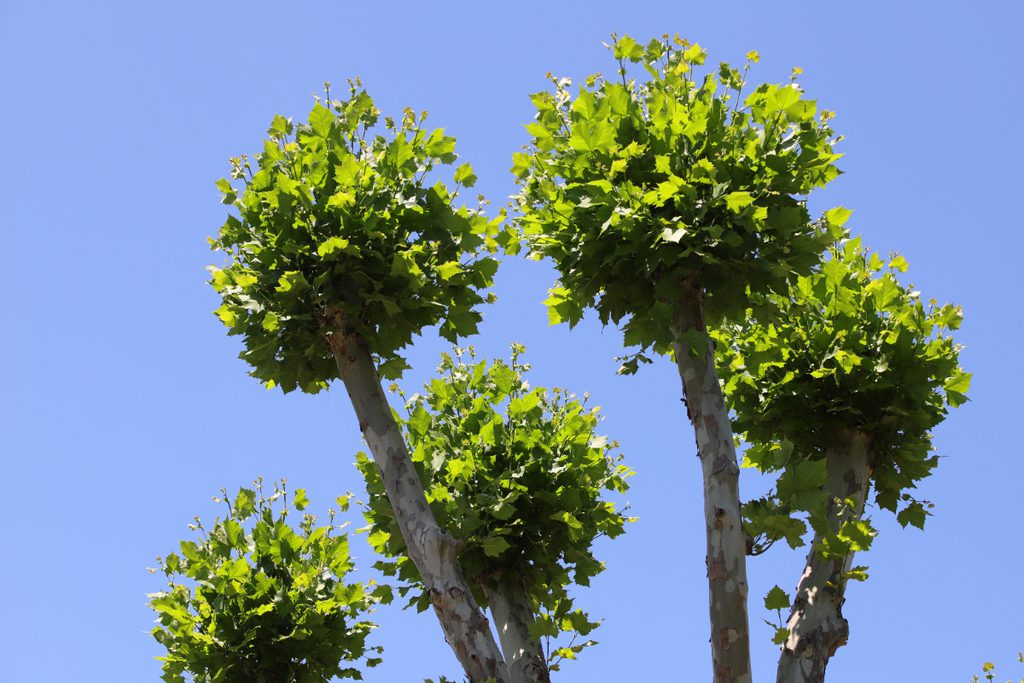
Water sprouts erupting from trees that have been non-selectively mal-pruned with heading cuts. Good job, guys! Looks great. Image source
Water sprouts erupting from trees that have been non-selectively mal-pruned with heading cuts. Good job, guys! Looks great.
These water sprouts can be dangerous on larger trees as they grow, because they’re weaker compared to normal branch growth, and can fall during strong winds.
They are ugly, more susceptible to disease, cause damage to gutters and power lines, and need to be pruned every year.
Topped plants may begin a decline in health that will eventually result in their death long after you’ve forgotten about your hack job.
You may end up blaming this decline on the bacteria or root rot that set in after the mal-pruning. You’ll probably try to use chemicals to help the doomed plant, and wreak a bit of havoc on the biosphere while you’re at it.
You can read a bit more about plant health problems to learn to identify some of the usual suspects.
2. Don’t shear
Unless you are making or maintaining hedges, shearing plants should really be avoided.
Shearing is when you take a pair of shears or a hedge trimmer to a shrub and basically just non-selective trim a whole lot of small stems. For example, shearing shrub or tree branches off a walkway or away from a gutter.
This encourages water sprouts, branch death, rubbing branches, discourages air to move around the branches to dry them out, and an overall messy plant.
This is a close-up of a hedge that is regularly sheared. Look at how this plant grows: lots of lateral branches growing, causing a thick mess of branches with very little airflow available. This is not how plants naturally like to grow. Photo via Plants Grow Here.
Certain plants are often made into hedges in ornamental gardens. While this isn’t optimal for the plant’s health, it is a normal part of gardening.
It’s best to save shearing for certain plants that respond well to this style of pruning like English boxes, diosmas, westringia etc.
Your lawn is basically a grass hedge and would be in this category too.
Once you start shearing, it’s hard to undo the damage. Water sprouts emerge, ruining the natural shape and forcing us to prune quite often or allow the shape to go wild and ugly.
Once a plant has become a hedge, we are often committed to maintaining it in that shape until it eventually dies.
3. Don’t strip
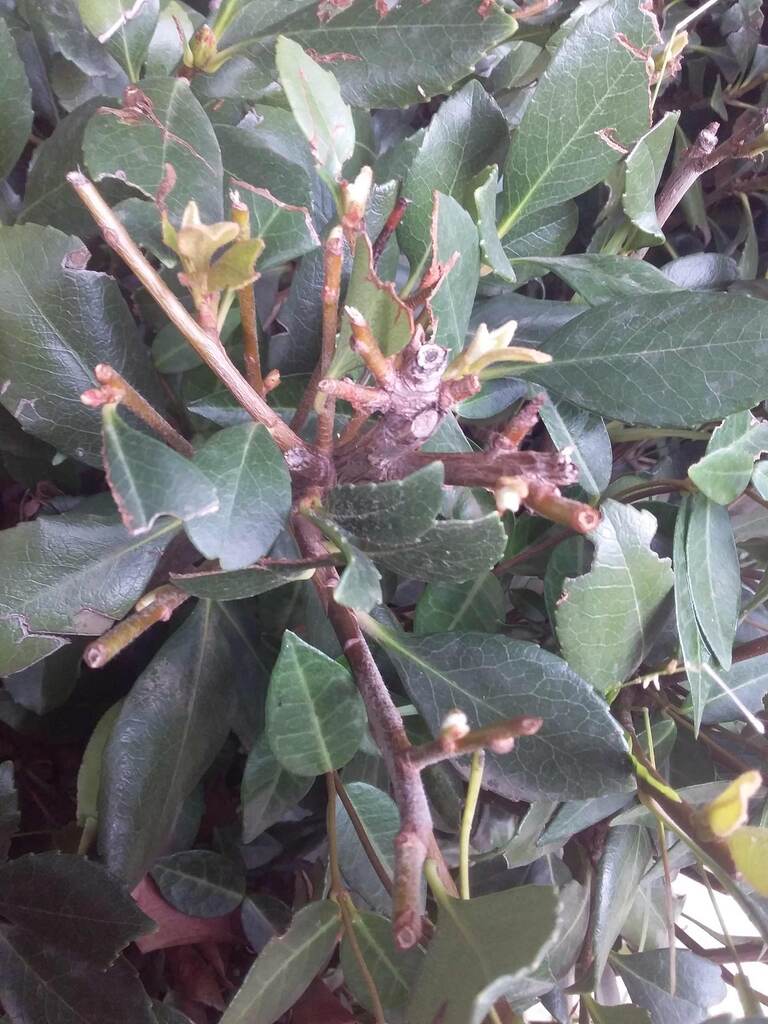
There’s nothing wrong with removing a couple of branches here and there, but taking off too many living lateral branches in one go is a big no-no and is called stripping.
Whether it’s skirting (taking off too many lower branches), over-thinning (taking off too many internal laterals), or lion’s tailing (leaving little lollipop poofs of leaves at the end of each branch), pruning too much is stressful on most plants, and some plants more than others.
See how these plane tree branches are pruned to look like lollipops without any foliage between the tips and the roots. This is called lions tailing and is a recipe for water sprouts and an unhappy tree. Image source
Stripping plants means less foliage for the plants to create sugar (energy) through photosynthesis while an abundance of branch material has to be supported and has to transport sugar the same distance it had to when it had more leaves.
This will likely stunt the plant and may even cause death.
When we prune correctly we take some, and then we leave some, leaving greenery the whole way around the plant.
4. Don’t over-plant
This one’s all about planting the right plant in the right place.
Plants have genes that dictate the size that they want to grow to. If you don’t take into account how large the plant will be in 5, 10, 30 years, you may be setting yourself up for pruning problems down the line, especially if you use topping cuts or shearing methods of pruning.
This presents a dilemma when you are planting saplings that you intend to let grow larger. Do you just leave a lot of empty space between them in the meantime?
Something you can do in this case is over-plant when they are young, and when the branches grow too close together you can remove every second plant. It’s a bit harsh on the plants’ behalf, but at least this way you don’t have huge gaps between tiny plants in the early stages of a garden.
How to Make Your Cuts
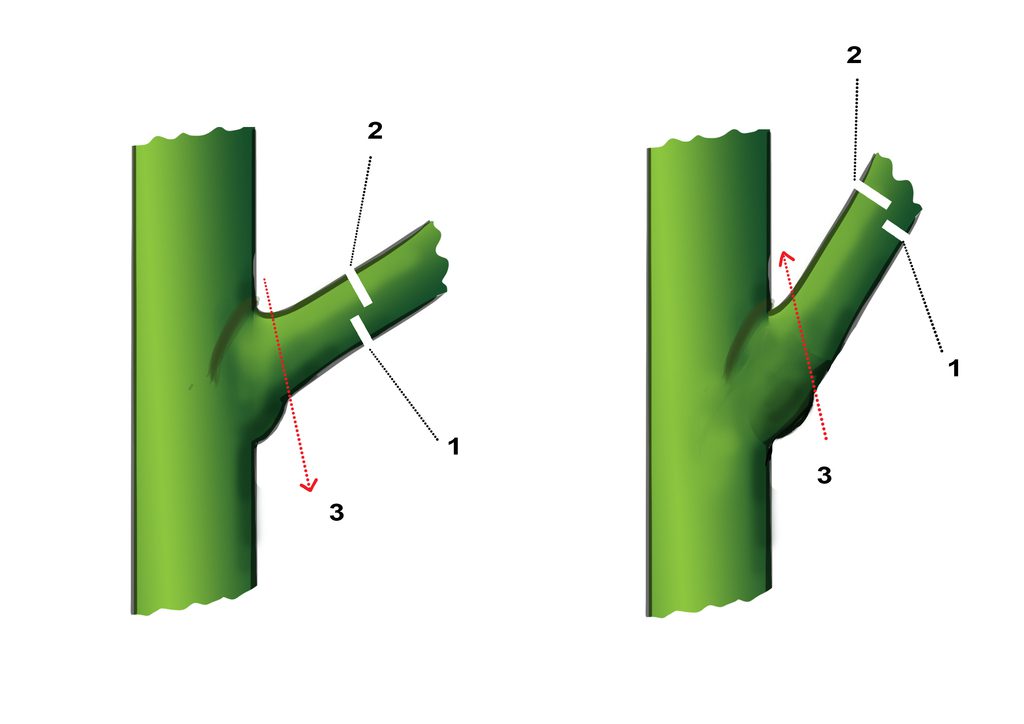
There are three main kinds of cuts that all cuts fall under: heading, reduction and removal cuts.
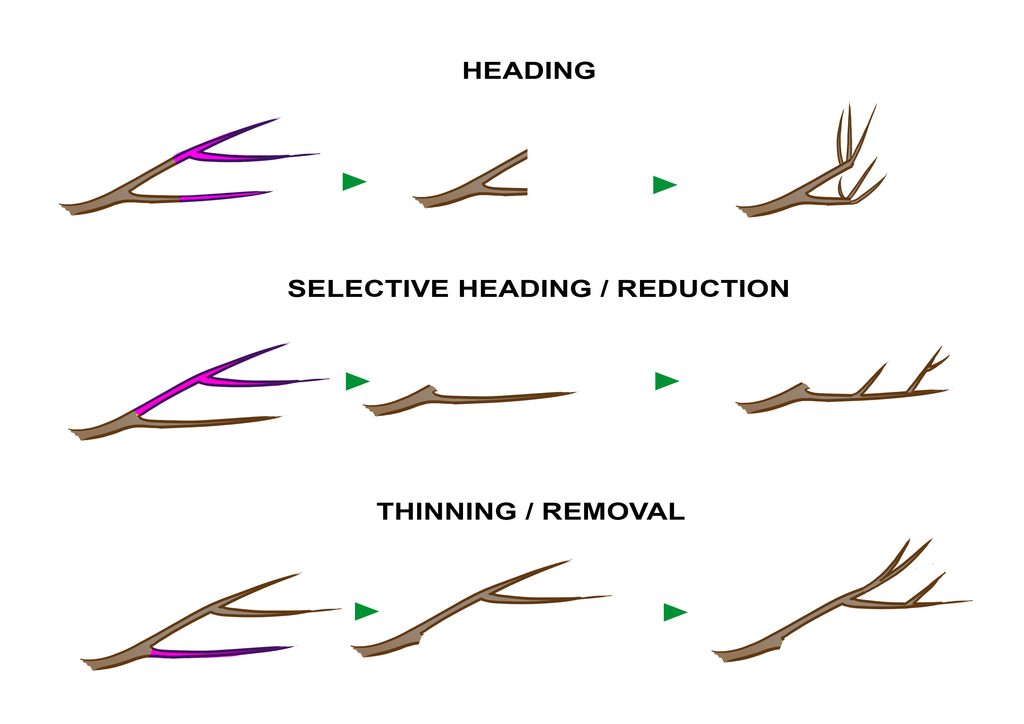
The three types of cuts: heading, reduction and removal. Diagram via Plants Grow Here.
1. Non-selective heading cut: shortening a limb to a random spot.
This can be done with a pair of loppers, secateurs, shears or a petrol hedger. The branch may die back to a lower fork, or even erupt in water sprouts. Every time you prune the water sprouts back with another heading cut, they will come back thicker and thicker.
Plant Amnesty founder Cass Turnbull calls this the “hydra effect”.
2. Selective Heading/Reduction cut: pruning a limb back to a fork with a lateral (side) branch of significant thickness.
The bigger the lateral branch the better, but you want to find a lateral that’s at least one-third as thick as the limb you’re trimming.
This reduces the likelihood of die-back or water sprouts and allows us to direct limbs in a certain direction as a new branch takes over as the dominant apical shoot.
Plants grow outward through their apical buds and throw out new lateral limbs primarily through buds within the leaf axil, and lucky for you I’ve actually created a tiny blog post explaining the concept so you can pause here and open this article in a new tab if you’d like to quickly learn before continuing on with this article. Learning about buds helps make sense of proper pruning practice.
A selective heading cut reduces the overall length of a branch and encourages the plant to choose a new lateral branch as the leader, probably the one you cut back to, instead of just throwing out water sprouts.
The branches may move over time as they search out a better location to capture more light.
3. Thinning/Removal cut: removing a limb completely back to where it started as an axillary bud, whether that is back to the tree trunk or back to another branch that it started on.
This is similar to a reduction cut in that it is made at the fork, however this time the parent limb is not cut. According to Cass, these are the “kindest” cuts we can make on a tree, because the plant finds them easier to seal off.
If you’ve decided to do a removal cut, there are three further ways that you can make the cut:
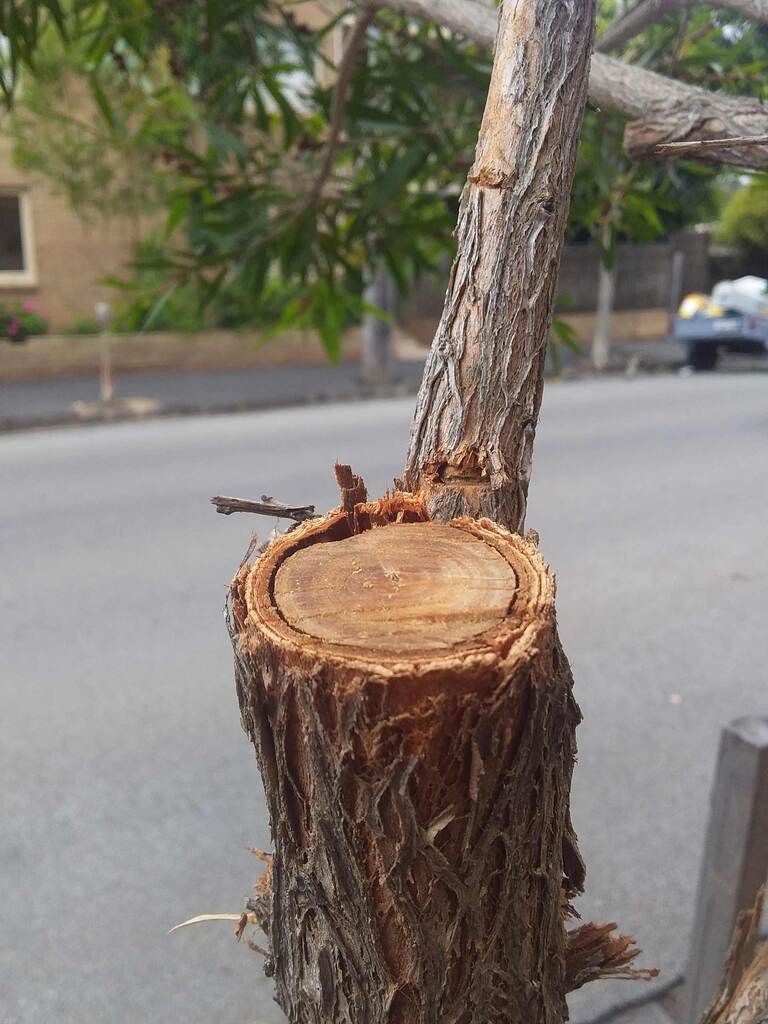
3a. Stub cut: too far away, leaving a stub.
3b. Flush cut: too close to the parent branch and into the branch collar.
3c. Collar cut: perfectly cut preserving the branch collar
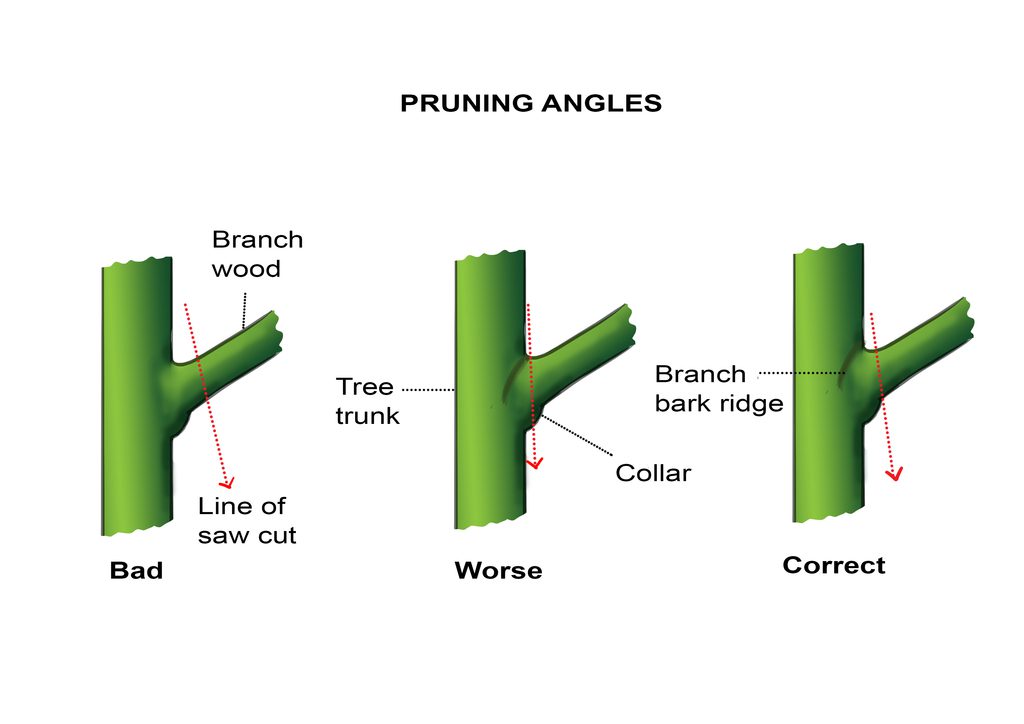
A stub cut is too far, a flush cut is too close, and a collar cut is just right. Diagram via Plants Grow Here.
The branch collar is part of the parent branch that wraps around the base of a lateral branch, but the lateral branch itself is barely attached to the parent. This is why you cause damage to the parent branch when you cut the collar.
If you can see the branch bark ridge, your cut should mirror this angle, which is the same angle as the top of the lateral branch (if it’s healthy, that is – dead branches may move). Study the branch collar pruning diagram above.
The collar is easier to find on some plants than others. Some plants just show you their collars, and others make you search for it. Some even trick you by having more collar than you would think, and some lack a collar altogether.
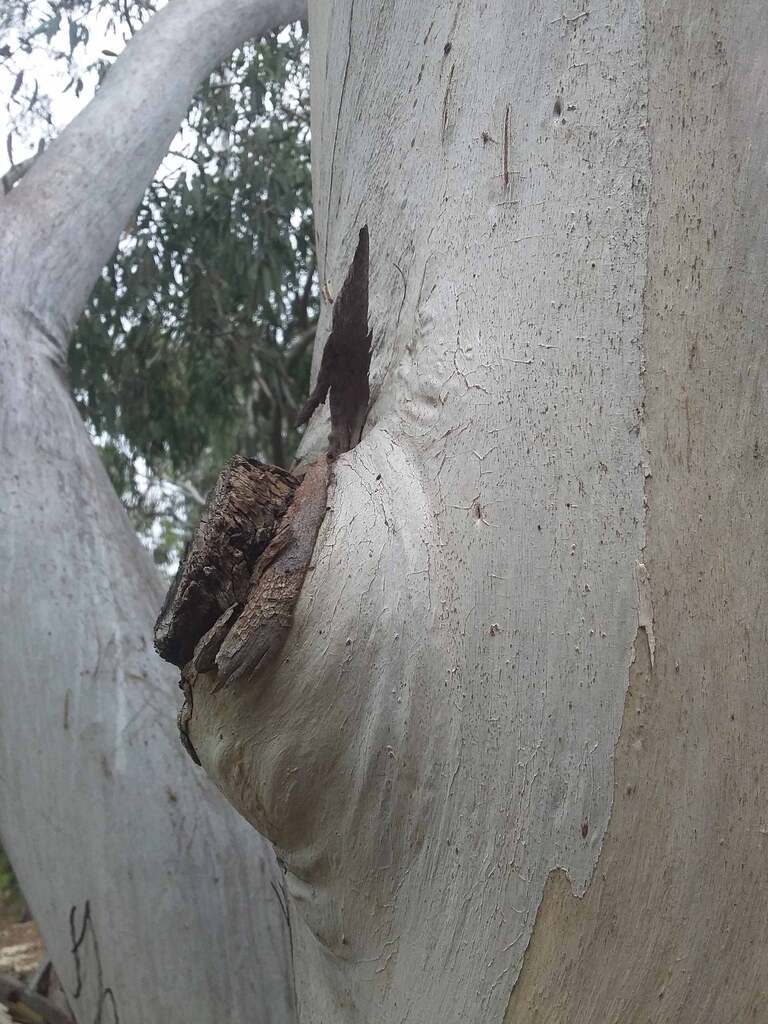
You can see how this branch was cut just outside the branch collar, and would be classified as a “stub cut”. At least the branch collar is unharmed. Photo via Plants Grow Here.
If you’re finding it hard to find a branch collar, err on the side of caution and leave a tiny bit of a stub. You can always come back later when the stub has died and is easier to differentiate and cut it. Better this than risk cutting the collar.
If you’ve made the correct cut, your wound will look like a circle, not an oval, facing it front-on.
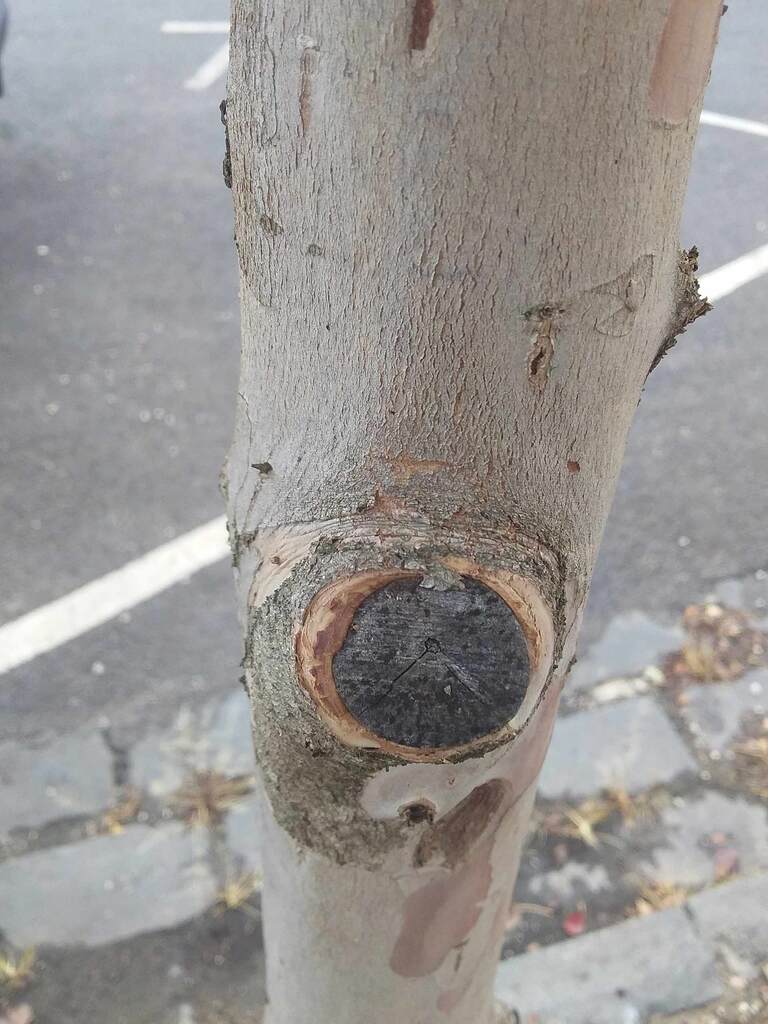
Look at that beautiful circle that indicates a proper collar cut has been made. See the tree starting to heal over the wound; eventually it will disappear beneath the lateral growth but will stay inside the plant as a “knot” that would be visible if somebody were to use the timber. Photo via Plants Grow Here.
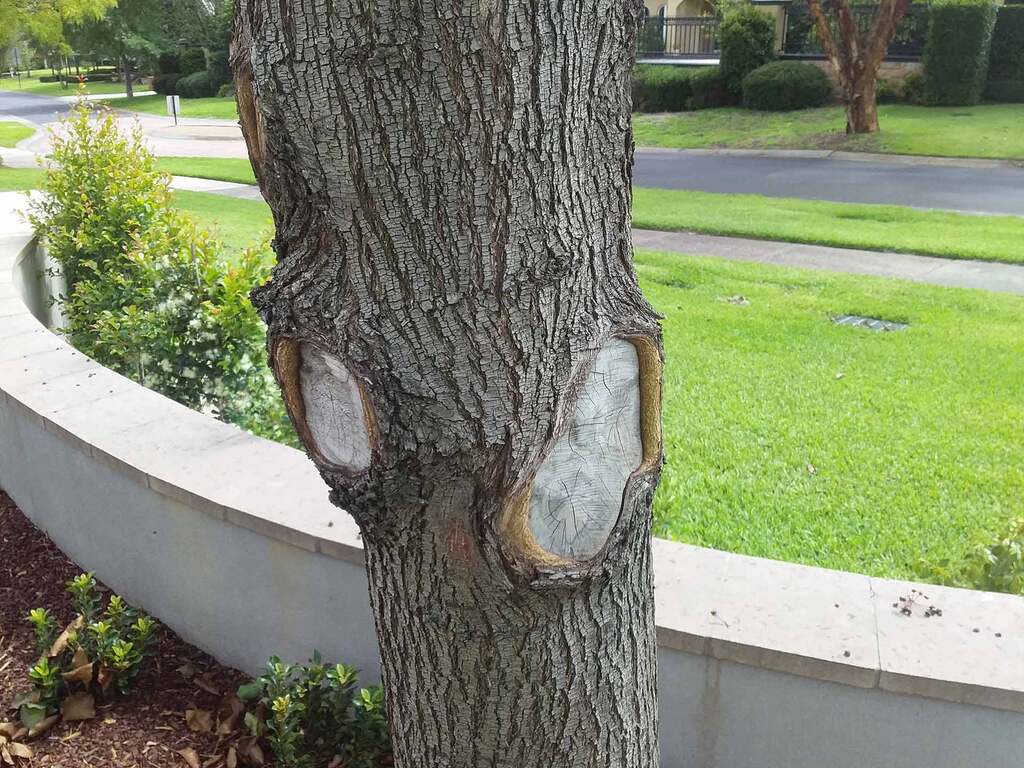
These are flush cuts, which are an example of mal-pruning. No effort was taken to preserve the branch collar and as such the collar has been cut. Notice the big oval wounds instead of neat little circles. Photo via Plants Grow Here.
Another mistake that’s easy to make is to tear the bark when you’re pruning. This is often done when pruning from the top. A heavy branch will snap two thirds of the way through your cut, and tear a ribbon of bark off the parent branch. Not good.
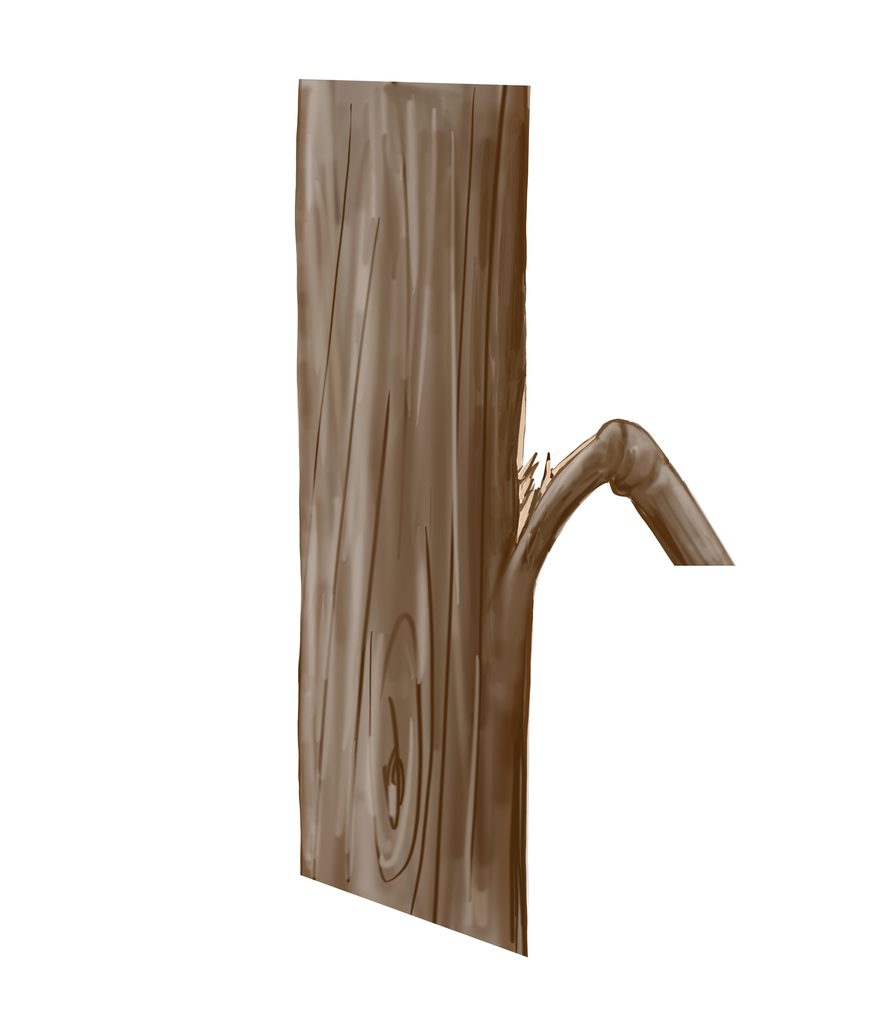
It’s easy to rip the bark when you try to cut a branch simply using one cut from the top. Diagram via Plants Grow Here.
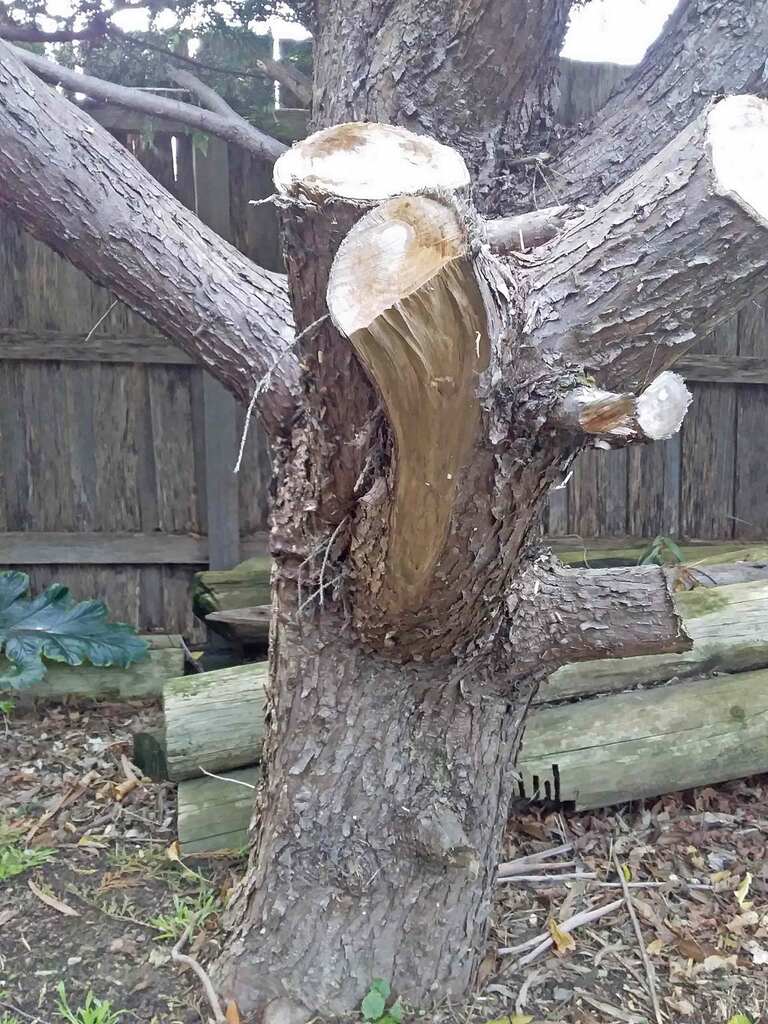
Ripped bark can take a long time to heal, and may invite diseases into the defenceless plant. These cuts were probably not made using the 3-cut method, and the ripped bark was probably caused due to the weight of the branch causing a split along the fibres before the cut was completed. Photo via Plants Grow Here.
Avoid this by taking the weight off using the three cut method. Make one cut about a foot from the fork, less than half way through the diameter from the bottom. Then cut further forward along the branch from the top.
This will prevent the bark stripping because the path of least resistance is for a crack to form parallel with the vascular tissue in the branch, between your two first cuts.
By making the first (bottom) cut further down the branch than the second (top) cut, the branch just falls off easily. Whereas if the top cut is further back than the bottom cut, the bottom section can sometimes push up and split the branch back along the grains made by the plant’s xylem, which are the veins a plant uses to transport water. Read more about plant vascular systems here.
By cutting from the bottom first and the top second (instead of just cutting from the bottom up in one cut) you avoid getting the saw pinched under the shifting weight of the branch.
Once you’ve removed the weight off the branch with the first two cuts, you can go back and make your third cut just outside the collar. This third cut can be made from the bottom or from the top, though cutting from the bottom is the best way to avoid the bark ripping.
Because you’ve removed the weight off the branch, cutting from the bottom shouldn’t cause the saw to get pinched this time.
Two versions of the 3-cut-method: one with the third cut from the top, and another with the third cut from beneath. Diagram via Plants Grow Here.
The ABCs and DDDs of Pruning
So we’ve established that we need to prune, and we also know how to make our cuts. The next step is to go through the “ABCs” of pruning, which stand for Assess, Bad Branches, and Competing Branches.
Assess: have a look at the plant from a distance, and up close.
Are there any plant health problems that we can see, or does it look healthy? What is the plant’s location, and is it too close to anything? What is the species, and does it look typical of its type? Where is the central leader, or “trunk”?
Bad Branches: look for the “three Ds”: dead, damaged and diseased branches.
Look for branches that have numerous unhealthy leaves on them, and remove these back to the nearest healthy-looking fork. Also look for branches that have “cankers”, which are sections with damaged bark.
The canker may have occurred by something rubbing or physically damaging the plant like a car bumping into it or long-term rubbing branches, or due to insect or bacterial attack.
Locate any crossing branches that are rubbing against each other causing damage and restricting vascular flow, as well as any water sprouts or suckers that can be immediately removed.
Branches on a tight angle might be good options to remove as well, because these are often weaker than branches at wider angles especially on fruit trees that can become quite heavy when holding juicy fruit.
Competing Branches: competitors to the main trunk, or the leading branch (with the dominant apical tip), are pretty good options to get rid of or reduce in size.
Anything that is running perfectly straight up in the same direction as the trunk can also be gotten rid of, unless you’re planning to cut the tip of the current leader and promote a new branch as the new leader.
Not all plants do have a main leading trunk or branch, so removing competitors to the leader doesn’t always apply.
Rule of Thirds
Every plant has its own preferences, and some plants you can prune a lot more off than others. I’ve seen huge pittosporums cut back to stumps with all of their foliage removed come back and look healthier than ever the next year (albeit with a lot of water sprout growth).
As a general rule, however, we don’t want to remove more than one-third of the living foliage on a plant. This is a good guide for what most plants can handle.
For some pruning-sensitive plants it can even be as low as one-sixteenth, so before you take a third off your plant you should research if it’s sensitive to pruning. If you can’t find any info on the topic for your specific plant, chances are that it can tolerate being pruned by a third.
You certainly don’t have to spend all of your pruning budget, but if there is a lower branch that gets in the way of your mowing, why not get rid of that one too?
Deadwood doesn’t contribute to this third, so take as much deadwood off as you want, preferably all of it!
Notice The Plant’s Habit
Different plants have their own growth habits: some branches grow as vines, some weep, and some naturally grow with one single leader and no other branches like palm trees. Some nodes are far apart, some close together. Some have many lateral branches, some have few.
A lot of the time, the most beautiful plants are the ones that keep their natural shape, so it’s nice to prune to them while trying to keep that shape. This means mostly taking dead wood and branches that look out-of-the-ordinary or are impeding traffic.
If you’re pruning a shrub that has a whole lot of crossing branches naturally, it can be hard to try to convince it that it shouldn’t cross its branches because it’s going to fight you. It’s much easier to just work with the plant instead of against it, unless you have a real plan in mind for the shape you’re going to try to force the plant into making.
Be Careful Of Nearby Branches
When you’re pruning, be careful not to wound any nearby branches. This takes incredible attention and skill, and even when you’re trying your best it’s very likely that you’re still going to accidentally damage the wrong branches and that’s just a part of life.
This is a reduction cut where the main leader was cut back to a lateral branch. Unfortunately, the bark on the lateral branch has been cut slightly by the chainsaw. This may cause issues if the plant’s phloem (sugar veins) have been sufficiently damaged. Also notice the bark around the reduction cut has separated from the plant – there’s not much that can be done to prevent this beyond having sharp tools and a steady hand but it’s still not ideal when it happens. Photo via Plants Grow Here.
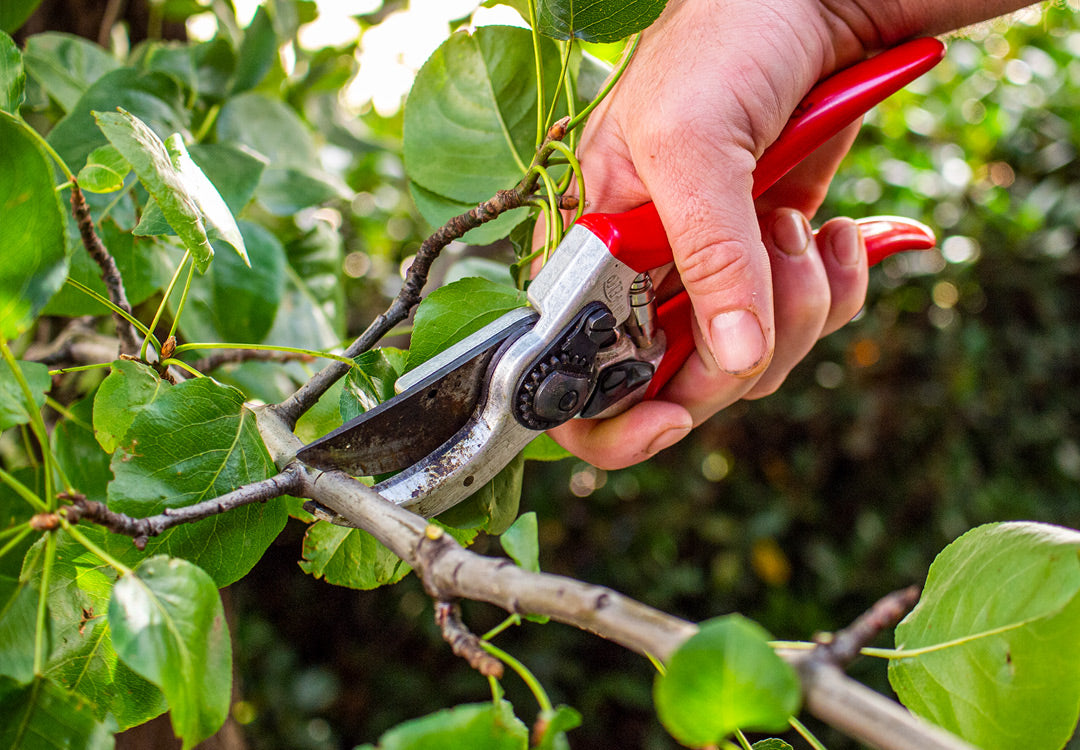
Which Tools To Use
There are a range of tools you can use for this job, depending on the branch you’re cutting.
Hand pruners, or secateurs, are great for thinner branches. Loppers and hand saws are perfect for medium-sized branches, and a chainsaw is best for larger branches. Sharp tools make cleaner cuts, so regularly taking an angle grinder to your seccies, or taking your chainsaw to the mower shop to get sharpened will help improve your pruning game as well.
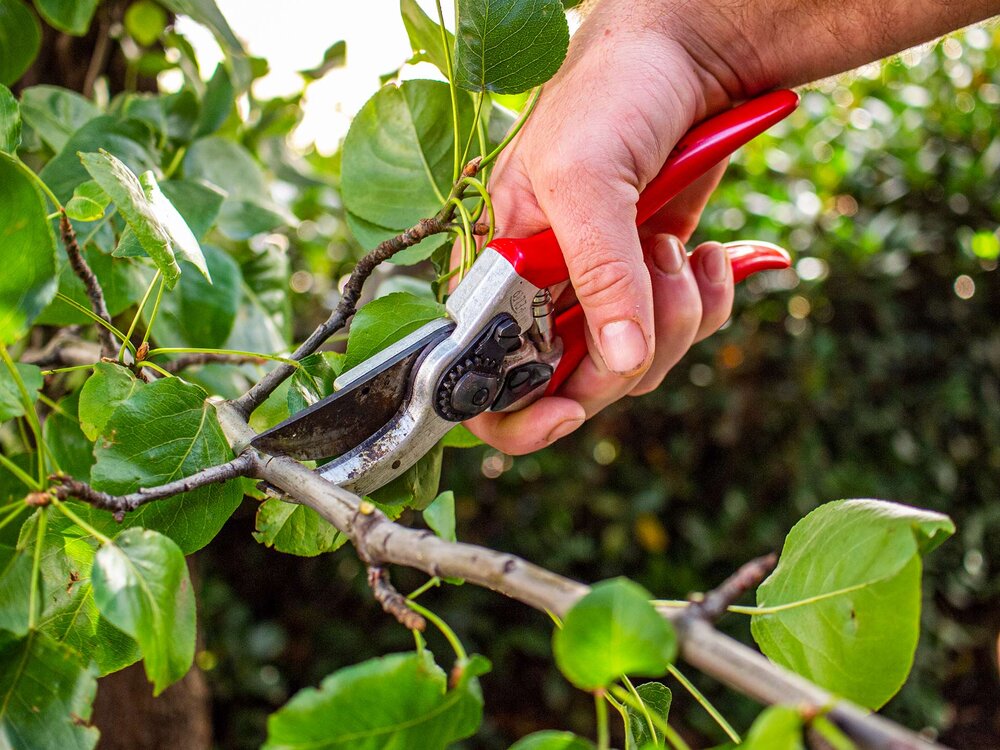
Selective heading reduction cut made on a thin branch with a pair of hand-held secateurs. Photo via Plants Grow Here.
Health & Safety
Always make sure you are trained in the machinery you’re using and read the manufacturer’s safety instructions.
If you aren’t trained to use a chainsaw, do not use one. They are incredibly dangerous tools and it’s not worth risking your life over. Either get yourself a chainsaw ticket for felled and low branches by doing a half-day course or use a hand saw, pair of loppers and a pair of secateurs.
Think about where your branches are going to fall before you cut. Obviously keep pedestrians and other fragile things away from the area beneath the branch.
Any projects that are outside of your capacity, like older and taller trees, or those near power lines and rooftops, should be left to a proper arborist. Don’t hesitate to reach out and contact a local qualified professional to do an assessment and provide a quote, and you can make a decision from there whether you’d like to engage their services.
Conclusion
It takes some practice to prune plants well without damaging the bark, getting as close to the branch collar as possible, and training plants to grow in the shape you desire.
By selectively pruning we can keep a more natural appearance to trees and shrubs instead of encouraging plants to throw off watersprouts and dieback which can both potentially lead to an ugly looking plant.
I personally think the natural shape of most plants is often the most beautiful version of the plant, with dead wood and bad branches removed as discussed within this article, of course.
You might find you’d like to read this article multiple times which is to be encouraged because it was quite a dense one. I’ve included a video from Plant Amnesty below if you’d like to check out that resource also.
According to Plant Amnesty, three signs that you are mal-pruning are die-back stubs, water sprouts and increasing maintenance. This means that unless you’ve got hedges or have mis-planted, your garden should be getting easier to maintain, not harder.
Where To From Here?
If you haven’t already read my articles on nodes/internodes, buds, meristems and vascular systems, I do recommend that you do so to get a broader picture of why these pruning concepts work.
If you’re already on top of all of that info, you might want to move onto another topic. Maybe give one of these articles a go!