It can be difficult to know what to feed our plants, and walking through the fertiliser aisle in the local nursery can be a little bit overwhelming due to the sheer number of options that are available.
By the end of this article, you’ll know why you should favour organic fertilisers over inorganic fertilisers, your organic fertiliser options, and how to apply them.
Using the right fertilisers helps create healthier plants, and more nutritious fruit and veg. Image source
What Nutrients Do Plants Need?
Plants need a broad spectrum of nutrients to perform all of the functions that they need to, and each plant differs in its nutritional needs.
Some of the main elements that plants are particularly reliant upon are carbon, oxygen, hydrogen, nitrogen, phosphorus, potassium, calcium, magnesium and sulfur. In addition to these main nutrients, plants also require countless micronutrients found in normal, healthy soil (read more about healthy soil here) for example manganese, silicon, boron and zinc.
The big three nutrients that gardeners traditionally like to focus on are nitrogen, phosphorus and potassium (NPK). Nitrogen helps give a healthy green colour to the plant and is heavily involved with photosynthesis. Phosphorus improves flower and fruit production as well as root growth. Potassium is necessary for overall plant health.
All commercial fertilisers contain NPK in some ratio advertised on the packaging, but not all fertilisers contain the necessary micronutrients, broken down organic material or beneficial microbes that organic fertilisers do.
The NPK ratio is useful on organic fertilisers to choose which one best suits your plants’ needs. Sometimes, you may have a plant that is particularly hungry for a particular nutrient.
You can add a fertiliser which is particularly high in nitrogen like fish fertiliser or manure into the mix if you want to promote leaf growth and a vibrant appearance. Potassium is good if you want extra potassium to encourage better blooms and juicier fruit.
Organic Fertilisers vs. Inorganic Fertilisers
When shopping for fertilisers, you have the option of using organic or non-organic products. This can be confusing, because one may assume that “organic” fertilisers are made from only certified organic ingredients, similar to how we classify “organic” food, however this may not be the case.
Organic fertilisers are those that are made up of real composted biological material (basically things that have died such as plants, animals, and fungi) with microbes still working through and breaking them down just as nature intended, and this is what you really want to feed your plants for optimal health.
As a result, organic fertilisers and other natural amendments such as gypsum and dolomite can help build healthy soil and heal unhealthy soil.
Contrast this with artificial fertilisers like slow-release granules which do nothing to contribute to the soil, but only contain nutrients to make plants look healthy.
There are circumstances when artificial fertilisers can have a place, however do not use them while sacrificing organic matter to maintain healthy soil.
See their nutrient profiles and choose one or more that will work with your plants’ needs.
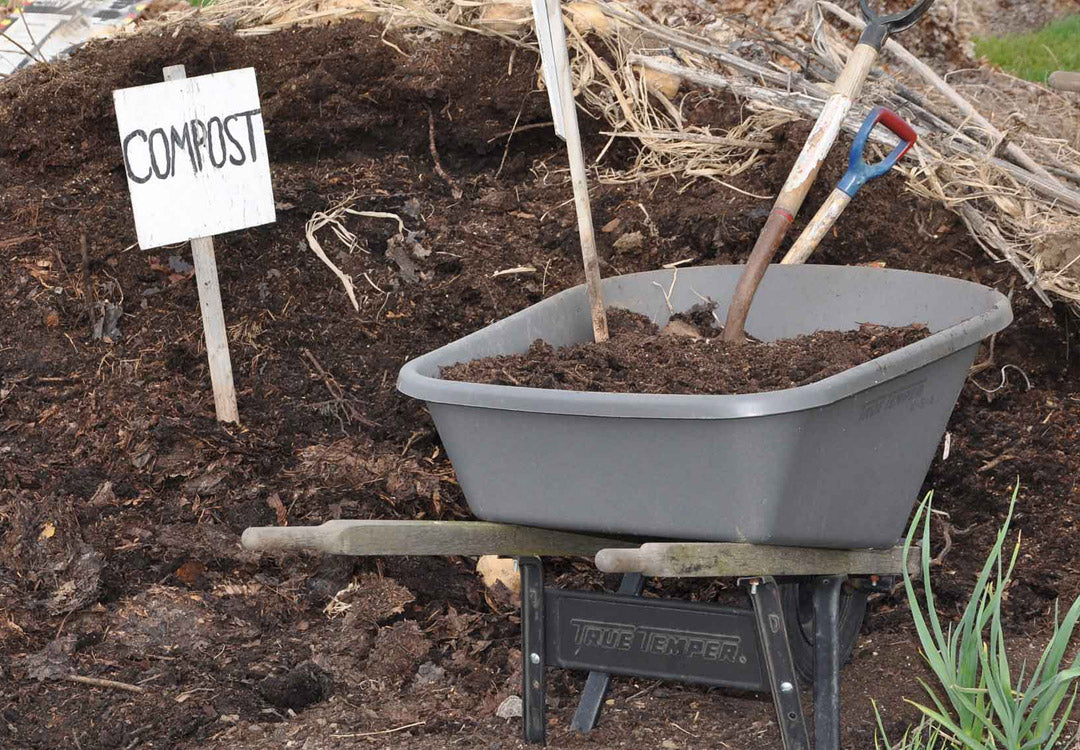
Compost
When organic matter like hedge trimmings, grass clippings and kitchen scraps break down enough to resemble soil, you’ve got compost.
There’s a reason it’s called “black gold”; it’s the perfect fertiliser and soil amendment with a low nitrogen amount when compared to other fertilisers like animal manure and fish fertiliser, so there’s less risk of nitrogen burning your plants.
If you’re shopping for compost, you should be able to know what you’re looking at so that you don’t buy junk. Below are four things to look for to make sure you’re getting the good stuff.
Texture: it should be fluffy, not compact.
Colour: it should be black.
Smell: it should smell like earth; if you can smell ammonia the compost isn’t finished yet.
Clean: there should be no chunks of plastic, metal, packaging or uncomposted material in the mix. The ingredient list should be good; no soil fillers or dodgy sewage.
If you’re buying compost that somebody else has made, the fact is that you can’t be certain of what has gone into it and are probably going to be getting compost that contains traces of chemicals.
Whether it’s grass clippings that had liquid chemical fertilisers applied, or it’s rose petals with pesticides on them, these chemicals take time to break down and are often present in trace amounts in compost. The good news is, the biological life in healthy soil can work incredibly efficiently at breaking these chemicals down.
In order to get the best quality compost, shop around at your local markets and garden stores and don’t be afraid of paying a little bit extra. Even better yet, make your own!
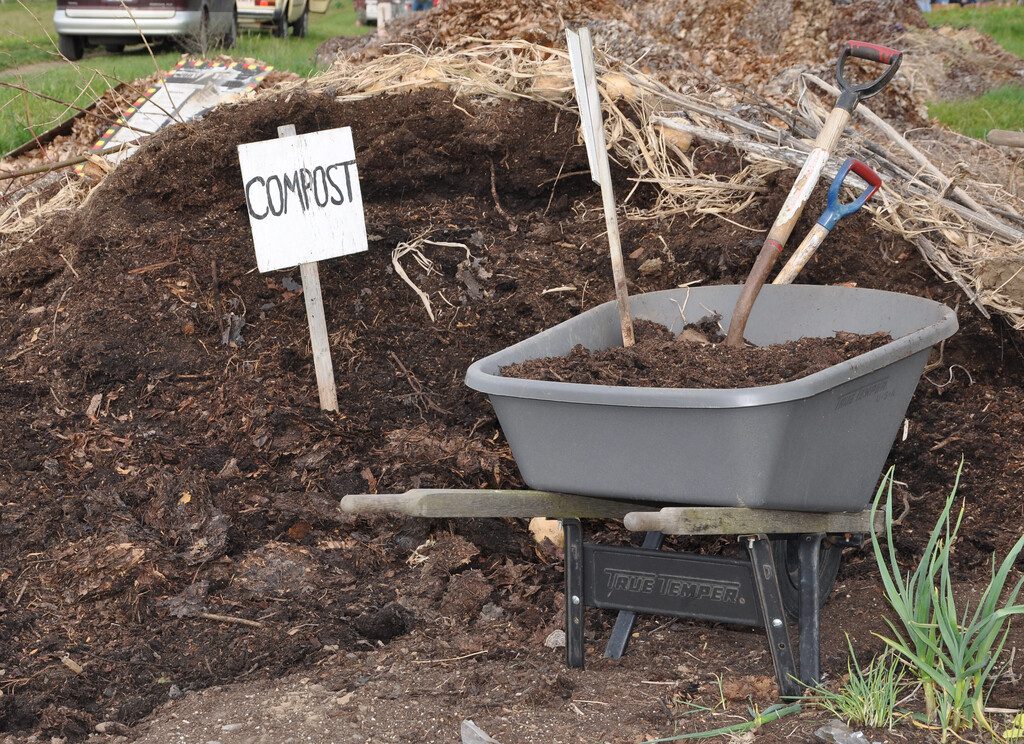
Compost can be created at home, or purchased through a local garden centre. Image source
Vermicompost
Also called worm castings, vermicompost is what’s left after organic material has been decomposed by worms.
Chock-a-block full of beneficial microbes, this fertiliser encourages worms already present deep in the earth to rise up to the rhizosphere, which is the part of the soil where plant roots are.
Unlike composting methods, worm farms don’t need to be kept outside.
They don’t smell and a vermicomposting unit is affordable and doesn’t take up very much space at all, so it’s an awesome alternative to composting for those of us that live in apartments.
Animal Manure
One of the most popular fertilisers has always been animal manure, and it’s no wonder with its whopping nutrient profile and the fact that it’s a bi-product of farming animals.
Some common forms are chicken, sheep and cow manure. If you’re looking for the most nutrient rich fertiliser, look no further than chicken manure which has the highest nutrient profile in N, P and K.
Sheep and cow manures have lower NPK profiles than chicken manure. They both have similar P and K profiles to each other, however sheep manure has quite a bit more nitrogen than cow.
All three have high levels of all nutrients, so be careful not to over-apply to avoid burning plants.
Avoid using human, pig, cat, and dog manures as they have a higher risk of carrying parasites that can be harmful to humans, especially when they’re used on vegetable crops.
Be careful when applying onto edible crops, especially where the crop itself touches the manure like leafy greens and root crops because using manure does carry a risk of E. coli contamination.
“Hot” fresh manure are especially unsafe due to E. coli, and can also burn plants due to high levels of nutrients and salt, so instead use composted manure that has been mostly broken down by organisms.
Seeds survive digestion through the digestive tract of sheep, horses and cows but chickens are able to neutralise 98% of the seeds in their manure. Composting at a temperature of 60 degrees Celsius will kill most of these seeds off so you don’t get any unwanted weeds.
A good way to tell if your fresh animal poop has turned into usable composted fertiliser is the sniff test; if it smells like poop, it’s not ready yet. It should smell like regular compost before it’s able to be used.
The longer you leave the manure in the soil before harvesting, the safer; fertilise autumn crops in spring, and vice versa.
Liquid Fish Fertiliser
Fish fertiliser is thought to be more expensive than other forms of fertiliser, like compost, but does go a long way when diluted.
Liquid fish fertiliser contains water soluble nutrients that are easier for plants to absorb through their leaves and their roots than regular compost*. It also contains oils and proteins that feed your beneficial microbes.
Many people find the smell unpleasant, but it does dissipate after a couple of days when diluted as per the instructions on the bottle and applied.
When applied to the leaves liquid fertiliser is absorbed much more quickly and efficiently, however does temporarily mark the leaves externally where the brown liquid pools. Applying liquids to the soil take longer for your plants to absorb, but do add a lot of benefits to the soil.
Liquid fish fertiliser and liquid seaweed compliment each other beautifully; seaweed contains plant growth hormones and a broad spectrum of micronutrients, and fish fertiliser packs a real punch when it comes to nitrogen and phosphorus.
Blood & Bone
This one’s a double-hit. Blood contains very high amounts of nitrogen, and bone contains high levels of phosphorous and calcium, as well as other nutrients.
It’s a favourite among many gardeners because it goes a long way due to the high nutrient levels. You can add a pop of blood and bone
This one’s an organic fertiliser lacking in potassium, so adding potash can round it out a bit if needed.
However, because “native” plants don’t love a lot of potassium, blood and bone is perfect as it is.
Potash
The terms potassium and potash as pretty much used interchangeably in gardening.
Potash gets its name from an old method of extracting potassium from ash that would be leeched into pots, however these days it usually comes in the the form of an inorganic salt which is mined.
Therefore, it’s not really an organic fertiliser in this form. But it is a really great nutrient to add because it assists with a range of functions including photosynthesis, strengthening cell walls and water regulation.
Potash increases the acidity of the soil, so is commonly used on alkaline soils.
Biochar
Bio char is created by slowly burning organic material (like canes, nut shells, manure, etc.) at low temperatures in a low oxygen environment, retains the carbon and nutrients within the char.
The Department of Primary Industries, NSW, has come out strongly in favour of the use of biochar as a sustainable soil amendment moving forward into the future due to its ability to lock carbon by up to potentially five thousand years.
The DPI include a quote from Prof. Tim Flannery, who was the 2007 Australian of the Year.
“Biochar may represent the single most important initiative for humanity’s environmental future. The biochar approach provides a uniquely powerful solution, for it allows us to address food security, the fuel crisis, and the climate problem, and all in an immensely practical manner.”
That’s some big talk about a humble piece of coal, with implications that reach beyond fertilising and into almost every aspect of horticulture.
If you’d like to add some to your garden, it needs to be activated to get immediate results. If it’s not yet activated, mix with some worm castings and and water and leave for a couple of weeks or longer. You can let it ferment on a bare patch of ground with some leaves or a tarp covering, or you can do it in a bucket, covered to protect from the elements, but not air tight.
After it has fermented for at least 2 weeks, it is activated with abundant microbial life and you can till it into your soil and water deeply. About 5-20% bio char is recommended in the soil, depending on the quality of the existing soil. Fertilising in early Spring or late Autumn is generally recommended, and remember to cover garden beds with a nice, 10cm thick layer of mulch to keep moisture in and to keep weeds out.
Your garden will thank you for generations to come when you use biochar, which will probably last a lot longer in the soil than any of the roots of the plants present today.
Seaweed “Fertiliser”
Seaweed is one of those elements you can add to your gardening repertoire that will help you take your plants to the next level. It’s packed with a broad spectrum of trace elements like zinc, iron, and potassium as well as plant hormones that naturally assists with healthy growth and root development, help avoid transplant shock, and encourage seeds to germinate.
However, it isn’t technically called a fertiliser due to the low amounts of nitrogen and phosphorous. This is why it’s often used with fish fertiliser.
Some gardeners think of seaweed as something to use only when transplanting, but seaweed has so much more to offer your plants even when they’re well established.
The benefits are well documented and have been scientifically tested many times, including one study which shows that a concentration of 15% seaweed provides a significant boost to plant height, yield and nutrient uptake in soy crops.
Betaines, present in seaweed, assist in the osmotic process and increase the amount of water able to be taken up by your plants, so it helps your plants if they are under stress or if you’re lazy with watering.
Complex carbohydrates feed important microbes and fungi that aid in disease and pest prevention as well as improving the uptake of nutrients. The more friends in the form of beneficial organisms, the stronger and more able to defend itself against pathogens a plant will be.
Seaweed can promote more flowers on your plants, and you may even get an additional flush of buds before winter that you wouldn’t get otherwise.
Apply a liquid seaweed solution to the leaves and roots in liquid form, and you can also till seaweed granules or pellets into the soil.
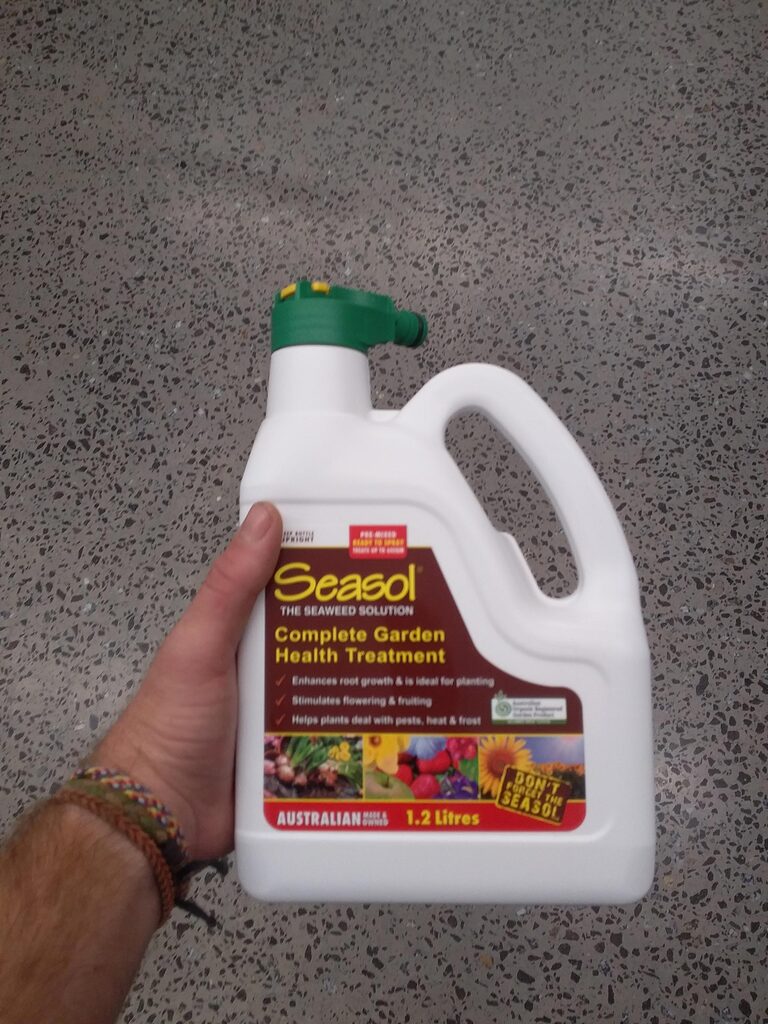
SeaSol is an Australian manufacturer or seaweed plant solution. This pack has a hose connection so you don’t need to worry about mixing yourself. Great for lawns and spraying over the leaves and roots in your garden. Photo via Plants Grow Here.
You can even pick it straight from the beach where it is legal to do so and add it to the soil as-is. Seaweed does not need to decompose before use like compost; it’s ready to use in your garden as soon as it’s been washed to remove the sea salt.
With that being said, it is still very beneficial in a compost pile and will help feed your microbes nicely.
Seaweed even makes a great mulch that discourages slugs and other pests that don’t like the salt or sharp edges of the dried material.
Because it doesn’t have high amounts of nutrients that burn your plants, you can use seaweed more liberally than other fertiliser types and utilise multiple methods of application.
Gypsum
Another inorganic plant food, gypsum has a lot of uses beyond just providing nutrients. Primarily, it is an awesome way to help break apart clay soil so that water can penetrate it and it can also help with salty (or “sodic”) soils.
It’s a good source of calcium and sulphur, helps with highly acidic soils, improves water filtration, and assists with reducing runoff.
I like to add an organic fertiliser like compost or manure with gypsum, because I also want to add some organic food for a broader spectrum of beneficial organisms to feed on.
Slow-Release Artificial Chemical Fertilisers
Look, let’s face it: they don’t have all the nutrients a plant needs. They don’t feed the beneficial microbes in the soil. And they’re said to have a larger environmental impact than organic fertilisers.
However, there may still be a place for slow-release artificial fertilisers in your repertoire, especially if your soil health is extraordinary and you already have heaps of composted organic matter in the soil.
You can just sprinkle these fertiliser pellets onto the top of the soil, so they are a bit easier to apply than tilling organic fertiliser into the soil.
I would personally avoid artificial fertilisers that aren’t labelled as being slow-release, because these release all of their nutrients upon contact with water. Plants don’t really want to be dumped with a whole lot of nutrients overnight without providing long-term help. Fast-release fertilisers are also notorious for causing nutrient burning to plants when they’re over-applied.
It’s important to note that organic fertilisers also slowly release their nutrients as microbes break them down, however when a gardener refers to slow-release fertilisers, 9 times out of 10 they’re talking about artificial pellets or granules.
If you do decide to use artificial fertilisers, it’s especially important to make sure to read the label on the packet.
How To Apply Organic Fertilisers
Whether you’re fertilising plants in pots or in the garden, there are two ways that you can feed your plants: through the roots, or through the soil.
Liquid fertilisers can be applied to the leaves with a watering can or a clean spray pack (just don’t use a spray pack that has been used for herbicides or pesticides without “triple washing” it using soap and a scrubbing brush).
Other fertilisers, including liquid fertilisers, can be applied to the roots. Liquid fertilisers are the easiest to add to the soil: simply use a watering can to apply them straight into the soil at the base of the plant.
Tilling the soil, meaning digging to loosen it, may be necessary if you have poor soil structure. Read more about soil health here.
With a post shovel, maddock or garden fork, dig down about 30cm (one foot) and mix in plenty of an organic fertiliser of your choice. For heavy clay soils, soil breakers may be required (like gypsum), or at least extra attention to break the clumps apart.
While it’s great for depleted soil, tilling healthy soil isn’t always recommended as it can disrupt the activity of beneficial organisms, including insects, bacteria and fungi.
For example in healthy soil, mycorrhizal fungi colonise plant roots and form a symbiotic relationship, and actually give nutrients to plants in return for carbon that the plant willingly trades.
Breaking apart the soil obviously disrupts these fungal connections, and the organisms have to create new connections all over again. The soil does eventually heal, but there is a better way.
Putting compost on top of healthy soil prevents damaging mycorrhizal networks beneath the soil surface. Because the soil is already in good shape, it doesn’t need immediate amending and so the compost can take its time to mix with the soil.
However you’re applying your fertiliser, ensure you water it in well to get the microbial activity moving, and your plants taking in the nutrients.
Ensure you’ve researched the nutritional needs of your specific plant before application, because every plant has specific needs and you can easily cause issues with incorrect fertilising. For example many “natives” don’t tolerate high amounts of phosphorous.
When To Fertilise
All plants have different nutritional needs, and we often fertilise in different ways depending on the plant and what we want from them.
Some plants we fertilise several times throughout a season, perhaps to promote more blooming and juicier fruit, and on the other extreme we have plants that barely ever need feeding, such as cacti and succulents that have evolved in nutrient poor environments.
A good time to fertilise with finished compost is the beginning of spring, just as most plants are putting on fresh leaf and bloom growth. A bit of compost, as well as some liquid fish and seaweed fertiliser gives a good all-round feed.
You may want to do a second and perhaps even third fertiliser round in the season, depending on the plant and your goals.
In the middle of the day, plants can be under heat stress, so it isn’t really the best time for them to be taking in plants. You want to fertilise before or after this time, when it’s cooler.
Fertilising early in the morning allows water to evaporate before the full heat of the sun. If you’re not able to fertilise early in the morning, in the afternoon is the next best option, however don’t make a habit of watering in the evening to avoid fungal pathogens (read more here).
Avoid fertilising when there’s still a risk of frost to avoid burning your plants. Gardeners in places with colder winters should consider fertilising later in the season.
Indoor plants may be fertilised softly from spring through autumn, but not through winter when the plants may be dormant.
Fertilising When Planting
It’s best practice to avoid fertilising at the same time as planting, as the root hairs inevitably break during transplanting are burned by the nutrients without a proper epidermis. This causes a bit of dieback of the root. Not the biggest deal in the world, but this dieback does need to be replaced which takes time and energy.
With that being said, I do often use a bit of compost or some “dynamic lifter” pellets when I’m transplanting, and while following other best planting practices (such as those mentioned in this post) I still see great results.
Whether you’re adding fertiliser or not, when transplanting a liquid seaweed fertiliser is best practice, for all of the reasons mentioned above. It’s just an all-round health treatment for plants.
Ideally, you would use liquid seaweed when planting, and fertilise with something a bit stronger like liquid fish or compost a couple of weeks later.
Soil Nutrient & pH Testing
Soil nutrients and pH can be measured with a home testing kit, which may be necessary if you suspect your plants are experiencing a nutrient deficiency.
It is possible to have a scientific lab test the nutrient profile and pH, and this obviously going to be the most accurate and comprehensive method, however let’s face it: most of us are going to be using a home testing kit which will be perfect for most of our needs and can be done at a lower cost and come with instructions that are simple to follow.
Nutrients can also be lost from the soil due to planting the same crops for many years, or through the lack of new organic material being added to the soil for an extended period.
Plants each have their own individual pH preferences, and soil pH extremes at either end can “lock” nutrients and make them unavailable to plants.
Overly alkaline soils can be improved with an acidic amendment, like compost or elemental sulfur. Overly acidic soils can be amended with lime (made from ground limestone rock).
If nutrient deficiency symptoms are displayed, such as chlorosis (or yellowing of the leaves, which may or may not be caused by nutrient deficiencies), liquid fertiliser can be applied to the leaves for the plant to absorb and alleviate deficiencies more efficiently than waiting for the soil pH to change enough.
Soils will generally return to their original pH levels over time. Our amendments are a bit like a drop in the ocean when you consider the sheer amount of soil under our feet.
Conclusion
The best way to help our plants stay happy is to replicate their ideal natural conditions, and death is a part of life in nature.
The dead matter which contains everything an organism accumulated during its life ends up back in the soil with a little bit of help from other biotic organisms, large and small, that help break it down.
Whether it’s manure, liquified fish, compost, or straight up seaweed being planted in the dirt, your plants will appreciate some good, old fashioned dead organic material
Mix and match different fertilisers based on your plants’ specific needs. Record what you use and compare with the results you see so that down the track you can see what has worked.
Where To From Here?
“Feed the soil, and the soil feeds the plants,” they say. Read this article I wrote to help to round out your knowledge of organic fertilisers.
Soil microbes help break down organic matter so that plants are able to access them. Read up on building up a healthy biodiverse garden through my below article.
Watering is integral to helping plants access the nutrients that you are feeding them with. Here is my article on the water needs of plants
Why not start learning something a bit different? Below are a few articles that you can read for a change of subject.